Dynamics 365 Inventory Visibility

Hello the community !
A new dedicated article about a new Micro Service (LCS Addin) for Dynamics 365 Finance Operations (more on SCM : Supply Chain Management part)
Wanted to consume your inventory data (on hand) and send also change from external system ? You want with Realtime and without decreasing performance side of your ERP : Dynamics 365 Finance Operations. This new micro service is for you ! Let's jump on how to configure it and use it directly in few minutes after in Power Platform (Power Apps and Power Automate)
Before going on the setup, let’s talk a little bit on the business side of the requirement behind the scene.
As you know now (I hope you do !) that Microsoft is pushing to leverage the ERP system without decreasing performance, by adding new LCS Addin (aka Micro Service) OOTB. Those new Addins, is very linked to Power Platform / Dataverse Environment as it’s now mandatory before installing it. Like we have now as of July 2021, Export Data Lake (table), Expense Management (OCR), Finance Insights coming up very soon, Tax Calculation etc…
The Inventory Visibility Add-in for Dynamics 365 SCM enables real-time global inventory visibility with external systems. The solution empowers companies to maintain a single, global view of on-hand inventory information and access it in real-time from their ancillary systems and applications.
Inventory Visibility is highly scalable and easily extensible to integrate with your third-party and ancillary systems. (handle large numbers of transactions across multiple channels)
Feature details
The Inventory Visibility Add-in for Dynamics 365 Supply Chain Management is in GA (end of December 2020) as MS Doc say. Strange thing is that the Addin in LCS is still marked in Preview.

This Addin is a standalone microservice that lets companies track global, on-hand inventory balances with minimal setup. This microservice is highly scalable and can handle the needs of high-volume retail and distribution operations. Inventory Visibility comes with an easy-to-use RESTful API that enables developers to integrate your ancillary systems.
The Inventory Visibility RESTful API supports queries that can access your on-hand inventory records in near real time. External systems can use on-hand inventory queries to retrieve inventory balances based on dimension sets, which lets you retrieve lists of available on-hand positions.
This highly scalable microservice is built on Microsoft Dataverse, which means that your developers can build Power Apps applications and Power BI analytics that deliver advanced, customized functionality that meets your specific business needs.
Inventory Visibility provides simple configuration options to integrate with multiple third-party systems. It uses the standardized inventory dimension combined with customized extensibility and standardized, configurable calculated quantities.
So let’s go directly to the configuration/setup part first. I would assume that your FinOps instance is already at 10.0.18, even 10.0.19 like me today.
You can setup it directly for production instance, like me today. Especially if you want to use it for just “reading” your inventory on hand.
Below, the MS Doc link, but like usual I would try for you to summarise a little better - especially because some parts are wrong… :) or not in the good order !
1st step is to go to your Azure Subscription / Portal: https://portal.azure.com
This step, you must be the Global Azure AD Admin !
Click on the top-right corner, the first button to open Azure Cloud Shell (if requested, create a standalone blob storage)

And type this Powershell command below :
New-AzureADServicePrincipal -AppId "3022308a-b9bd-4a18-b8ac-2ddedb2075e1" -DisplayName "d365-scm-inventoryservice"

You can check afterwards, if you see the App on your Active Directory by going here :
Portal Azure > Azure Active Directory > Enterprise Applications

You have to see : “d365-scm-inventoryservice”
Stay in Azure, to complete the last step on this part, we will have to create a dedicated Azure AppReg (Client ID, Client Token)
Portal Azure > Azure Active Directory > App Registrations > NEW Registration
(Give it just a common original name like me : “Inventory Addin D365 FinOps“) and keep the rest by default
Mark after the Application (client) ID in your note and create after a Create a Token in Certificate & Secrets part, again keep it somewhere securely :)

On Azure you have finished. Good !
Let’s jump to Dataverse side now.
For Dataverse, you should have one Dataverse linked to your FinOps Instance. It’s now mandatory to install LCS Addin. It’s also mandatory in case you want to activate Dual Write (it’s a very related topic)
So I would suggest 2 things, depends on how you are right now.
If you don’t have installed yet any LCS Addin on the FinOps instance, you should create one by going on LCS here :

After that, you should wait a little bit… like 1 hour - don’t know why it’s taking so long.
Otherwise, if you have already a Dataverse but not yet linked to your FinOps instance, you should link it directly in the Dual Write App
(Please don’t use the Default Dataverse environment : always !)
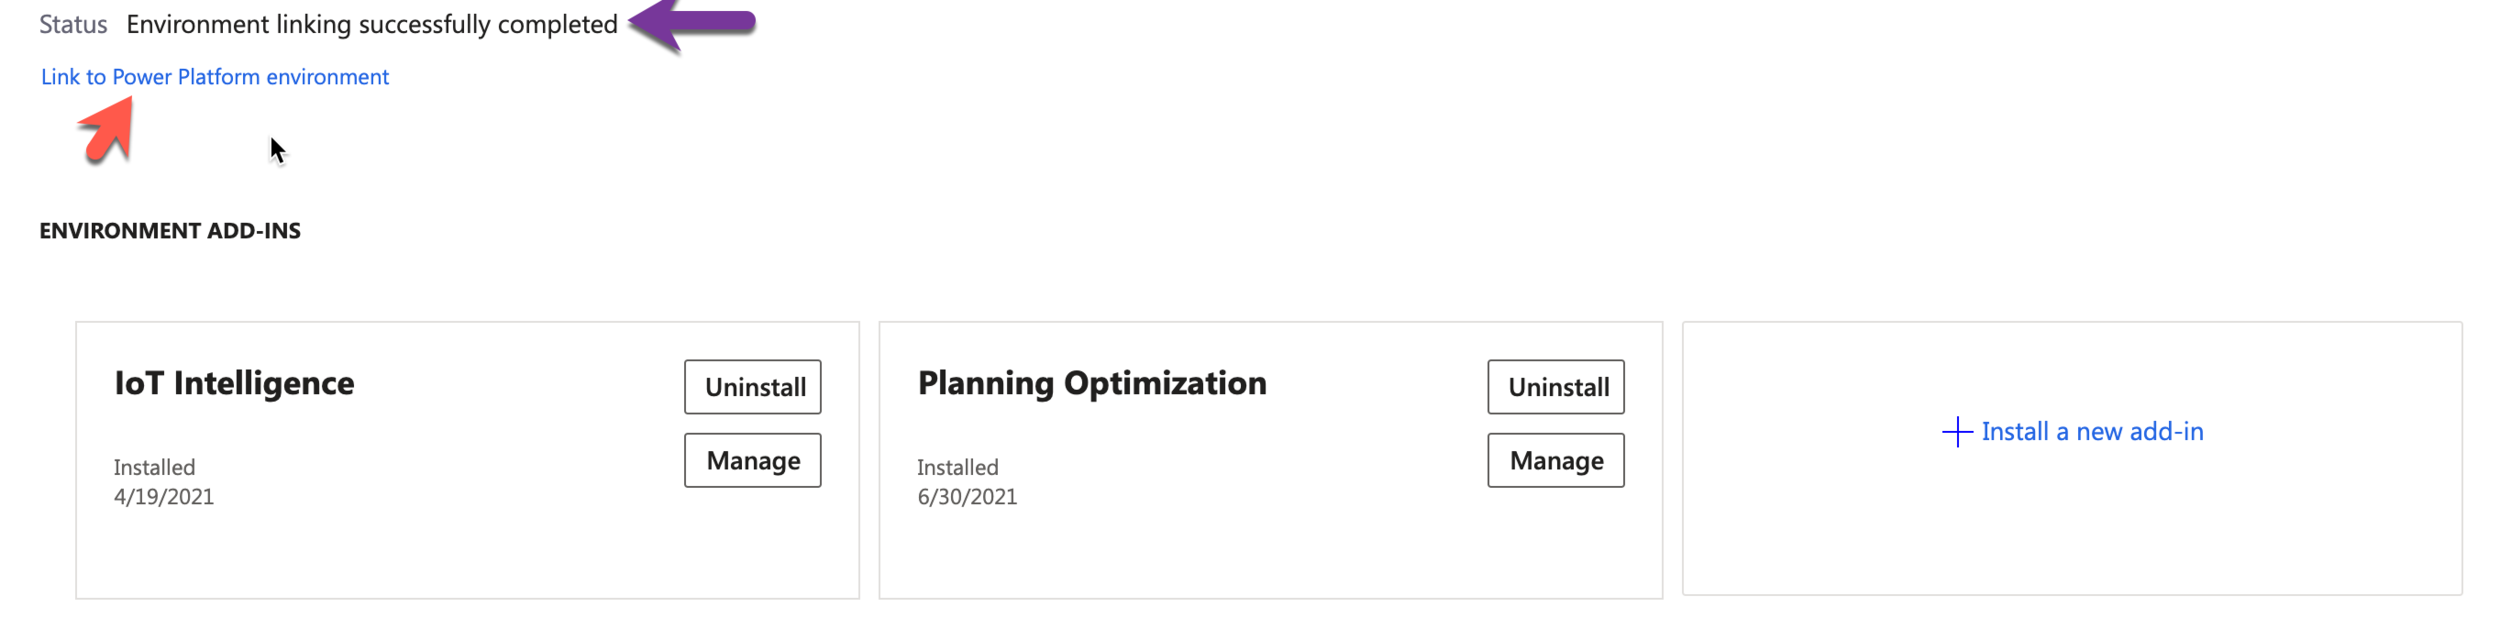
Click on the “Link Power Platform Environment” in case it’s not done yet, you should have afterwards the “Environment linking successfully completed” like me below. And of course now, the ability to Install New Addin.
So now, I assume that Dataverse is created and linked to your FinOps instance. We can setup the Dataverse side for Inventory Visibility
Fist step to do, is to check if you have the English Language activated (LC ID = 1033) for Dataverse
Go to the PPAC (Power Platform Admin Center) : https://admin.powerplatform.microsoft.com/
And go the Settings part.

Search for “Languages”

As you will see here below, I am French so apologise for that, but make sure that English is well selected (1033 code), otherwise activate it, it can take 30min to complete.

Last step to configure on Dataverse before importing solutions, is to activate the App User you have created (the one by Microsoft, not your AppReg you have created) - Go to the PPAC / Your Environment / Settings again and select “All Legacy Settings”

Security / Users

After select the view “Application Users”

Don’t forgot to change the Form to “Application user” too after like below :
Put the Application ID and save :
3022308a4a182ddedb2075e1

You shoud have after something like this : / After add the “System Administrator Role” to this App. (Manage roles)

So now, I want to show something (and especially for Microsoft), since I didn’t wanted to install manually solutions on Dataverse, I searched the Inventory Addin directly by going here (for your record, same procedure to install Dual Write solutions) :
Go back to PPAC , your Dataverse Environment > Dynamics 365 Apps

Select Install App like Below (again same thing now to install other solutions like Virtual entity for Finops, Dual Write, Data Lake, D365 HR Virtual Entity) :

Select like me “Dynamics 365 Inventory Visibility Offer” , I suppose this is the good one and same one.

And yes like me (I assume also) you will have this error. Damned !

Don’t be afraid, we have an another solution which I explain just after. But if you read this article in few weeks / months, maybe try again this step like below. It’s much better to do it like this. I suppose it’s a bug, and something in progress by Microsoft as of now.
So, 1st thing is to download manually the solutions here :
Extract the ZIP files, and check the folder, you will have 2 things :
Inventory Visibility Configuration Trigger : it’s a Power Automate flow we will install after
Dataverse solution, it’s what we install right now

To install it, go the Power Apps Make Portal : Power Apps
First thing to check, go the right Environment ! Going top right - Also go the Solution part in the Menu on left side, and activate Solution Preview to “On”

Click on the Import button and select the “Inventory Visibility Dataverse Solution.zip”

You can check the See History part, globally it can take 10min to install it.

When it’s done, we can now import the Power Automate Flow which I mentioned before. For that, go the Power Automate Portal
Again, please check you are in the same Dataverse Environment like before. Go the My Flows / Import button

Click on “Create as new” for the First part, and Click also on “Select During import” after to create or select your Dataverse (CDS) connection - and yes Microsoft use the deprecated one. Strange… :)

After import, go the Flow itself, and Turn on the flow !
And Edit it after.
First step, don’t change anything, the 3 other ones like below, you should put based on the Azure AppReg you have created yourself. Your own Client ID, Secret, and tenant ID.

After there you must be aware that the Micro Service have dedicated URL based on the region you are, same as FinOps and Dataverse side.

So like me in West Europe, I have this URL like below :

And now a bug , well globally the only remaining topic to change is this step : the URI is not good (BY DEFAULT)
Me, If I didn’t change it, I’ve got an HTTP 507 ERROR (Forward URL)
By looking in the details ERROR, I found the right direct URL to put (Suppose you should also put something different based on the region too)
https://gw.eu-il101.gateway.prod.island.powerapps.com/securityservice/token
Because normally, in the MS Doc they are talking about this URI (which as of today for me don’t work at all)
https://securityservice.operations365.dynamics.com/token

After that, Power Automate Flow is finally good and ready.
Now we will go to the last step of the setup (finally yes :)) - Finance Operations of course!
You have to install the LCS Addin we were talking about in the first part of this article. Like Below :
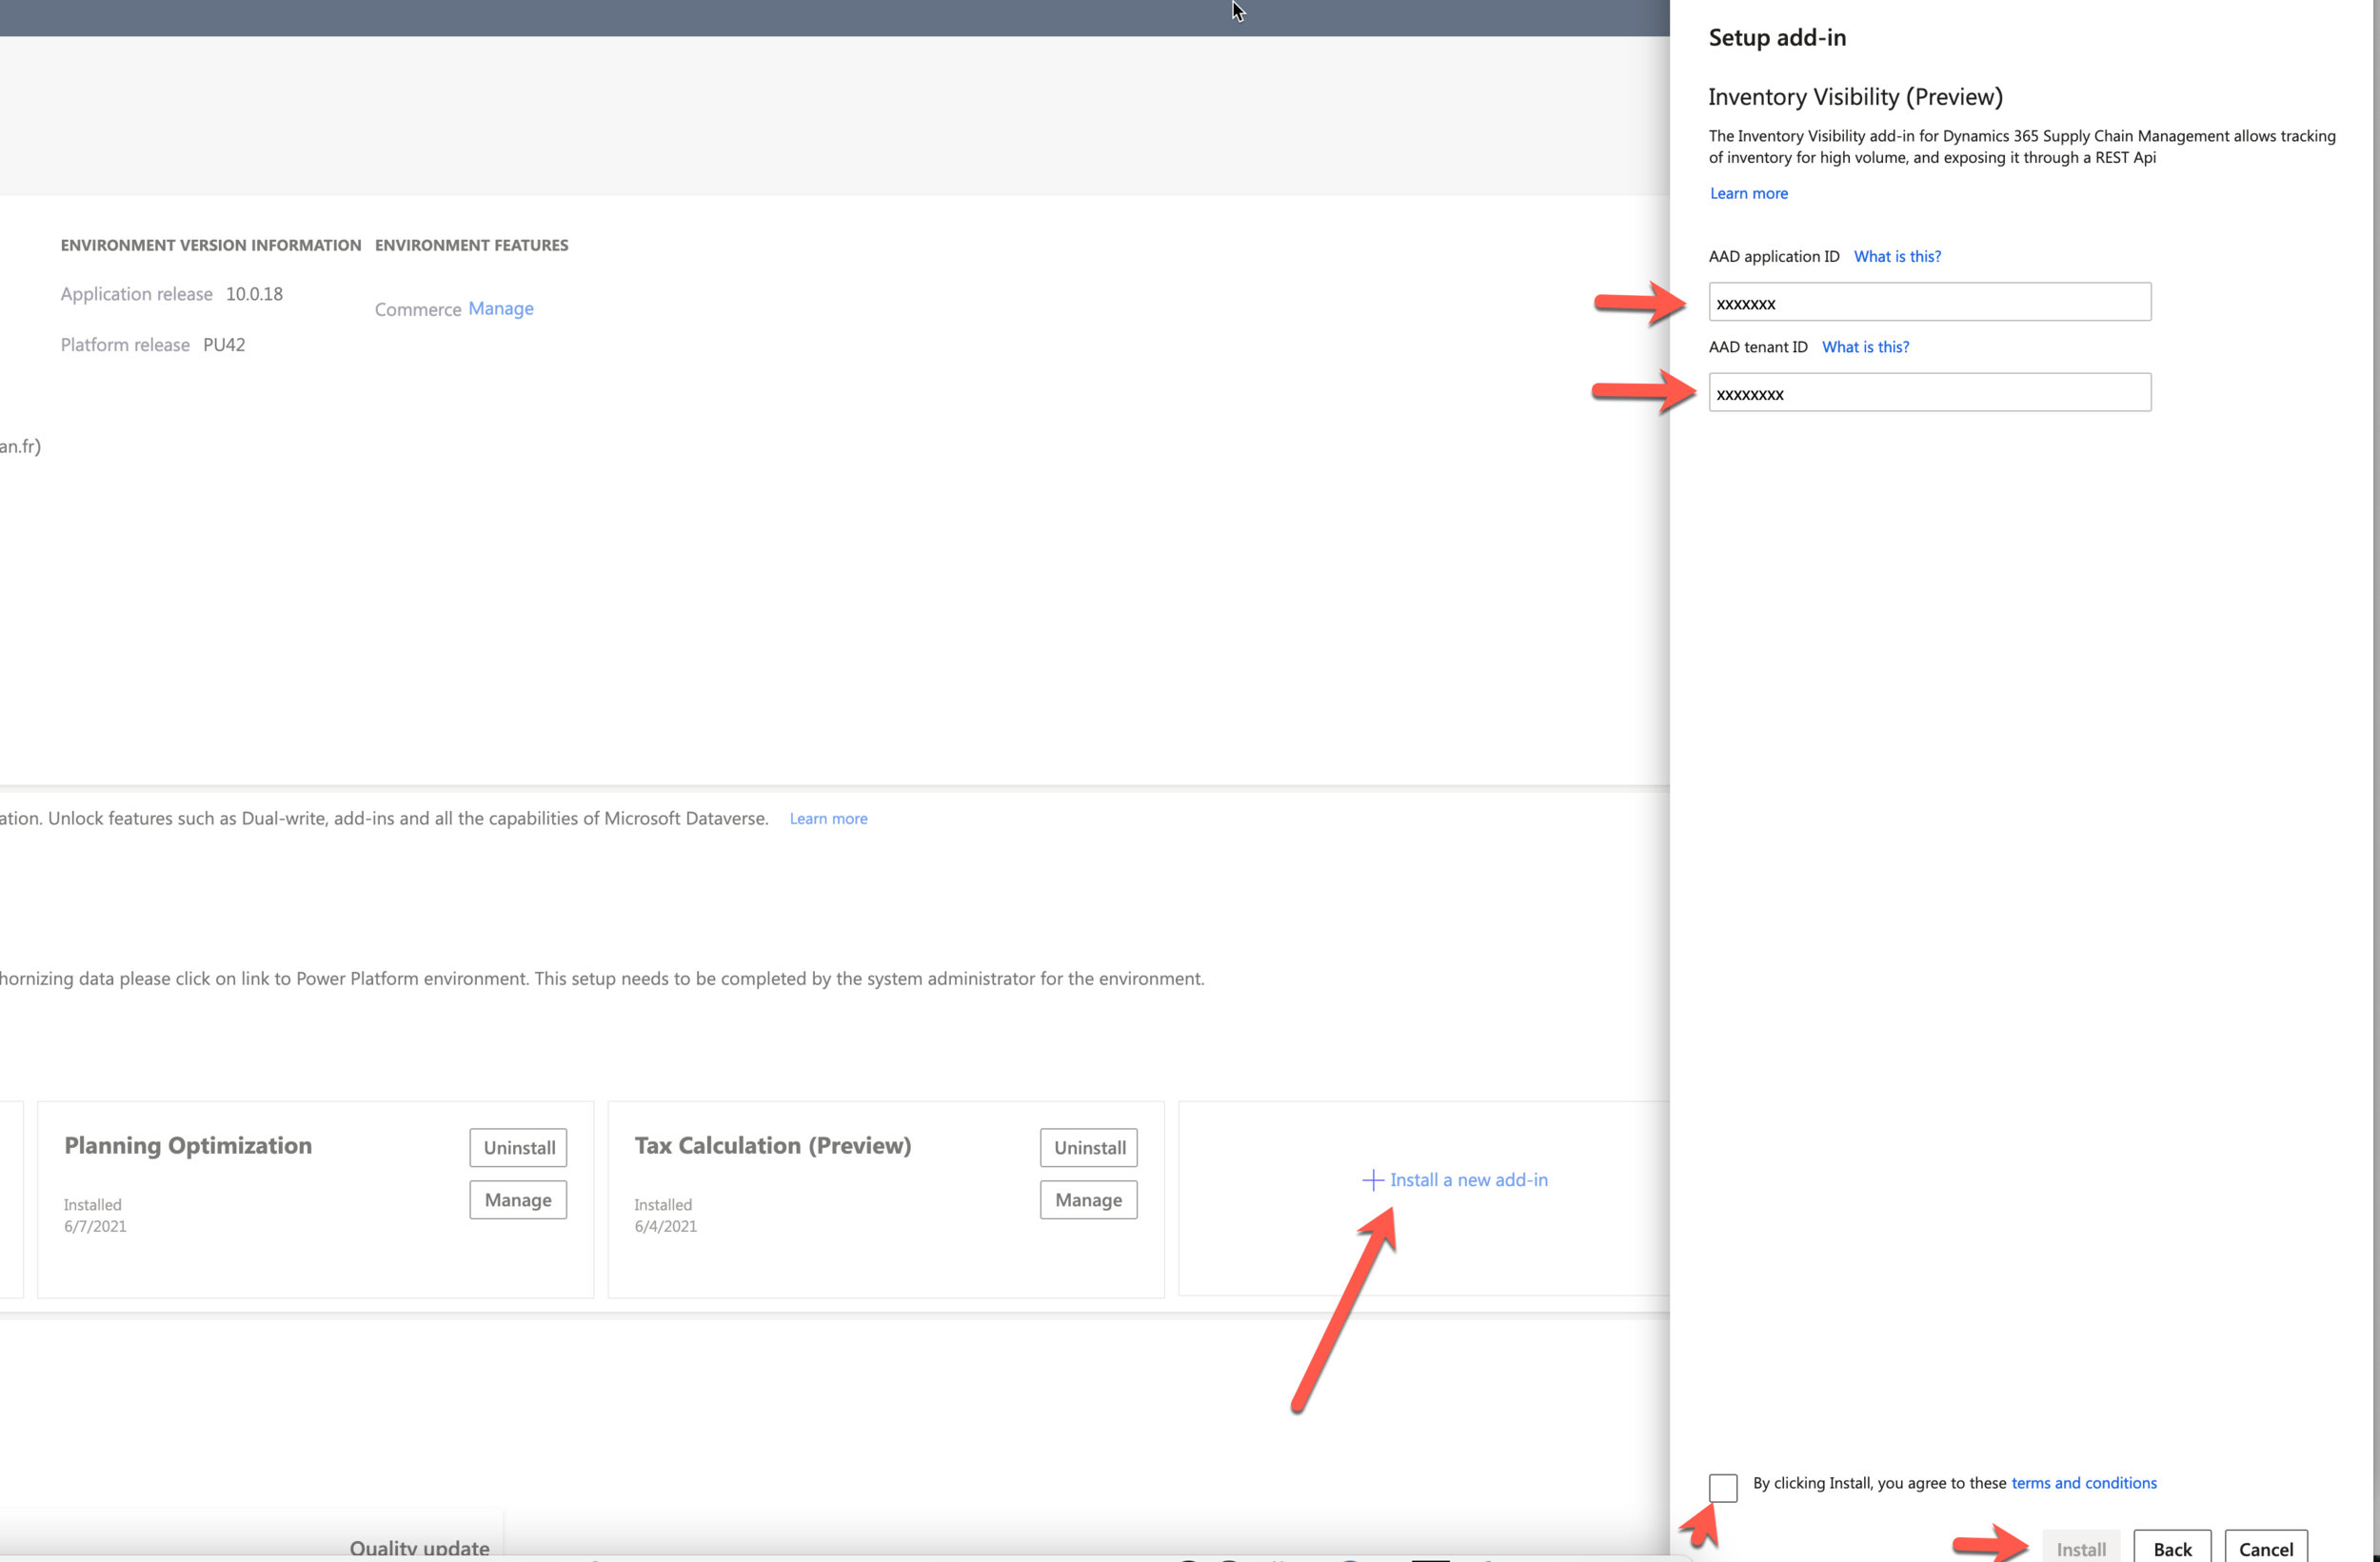
Wait… a little bit, until you have “Installed” in the status of the Addin.
After that, you go directly into the FinOps instance. By going to the Feature Management Workspace and search for the Inventory Visibility Integration part - and activate it.

Go the Inventory Management module now, you should have 2 Menu Items called :
Inventory Visibility Integration in the Period Task (we will see that after, it’s the BatchJob to sync the Data to the Micro Service)
Setup > Inventory Visibility Integration parameters - it’s where we go now

Put the right URL based on your region, it’s the same one you had in the Power Automate Flow (part : Initialize Inventory Visibility Endpoint) and don’t forgot to put 512 as max records for a single call. And not “0” of course :)

Now you can setup the Batch to Sync the data
So, here, you have to click on Enable, this will create the BatchJob to run after. You will see normally after the Record to be posted to the Micro Service decreasing - for the first init to sync.

You can go the BatchJob and change the recurrence you want, if you want “near” realtime of course, you have to put it to every minute.

Finance Operations is now good and well connected - synced to the Micro Service. You are all done here.
Check to Dataverse side, to see if the DATA configuration is well synced too.
Go back to the Power Apps Make Portal , in the Data / Tables part (again check you are in the right environment)
Change on top-right to “ALL” for the filter part

And type : “is_” in the Search bar , you will see all Dataverse tables coming from the solution you have imported before.
The first one to check and that’s important is the “On hand Configuration”

You have to see the Environment ID automatically populated for you. You can check it’s had to be the same as the LCS Environment ID (your FinOps instance)

Click on Edit Record too after, if it’s all good.
First, you will see that the Owner of this record is the AppUser (the App from Microsoft itself) that’s normal and should be like this
Click on Flow part, and select the Inventory Visibility configuration trigger you have imported before to Run it !

Go back to the Power Automate portal to check if it’s Succeeded
You will see that first check is by going to call their API if an Index Upgrade is not running, if not , they will run it for you. But… What is that ? :) - of course you will understand more when you will call directly the Micro Service but it’s good why you setup it this flow from Microsoft.
Well, most of the time, the inventory on-hand query will not only be on the highest "total" level, but you may want to see results aggregated based on the inventory dimensions.
Inventory Visibility provides flexibility by allowing you to set up the indexes, which are based on the dimension or the combination of the dimensions.
Side note : Currently, you can only configure indexes to a maximum of five. You need to carefully consider which dimension or dimension combination you will use before the implementation to ensure that it will meet your business needs. For example, if you want to query products as follows:
Query the aggregated product on-hand by the Color and Size dimensions.
In some cases, you just want to query on the product in total.
You would have two indexes defined as the following:
["ColorId", "SizeId"][]
The indexing defines how you can group your results based on the groupBy query setting. In this case if you don't define any groupBy values, you'll get totals by productid. Otherwise, if you define groupBy as groupBy=ColorId&groupBy=SizeId, you'll get multiple lines returned, based on the different color and size combinations in the system.

On Hand Index Configuration should after well populated in the same config as your FinOps instance.

Those are the main and standard dimension configurations you can use by default. And again could be an aggregation done in the API call you’ll do and to group by. Some can be useful especially for a Retail/Commerce stuff.

And it’s not the end, you can add custom dimensions too.
If a custom dimension exists and needs to flow to a default value when consumed by Inventory Visibility, you can configure the Custom dimension name in Inventory Visibility.
External systems access Inventory Visibility through RESTful APIs that enable on-hand information on given sets of dimensions to be queried. For the integration, Inventory Visibility enables you to configure the external channel data source and the source dimension to the target dimensions in Inventory Visibility.
The target dimensions should be one of the following:
Default dimensions in Inventory Visibility
Custom dimensions
The purpose of dimension configuration is to standardize the multi-system integration for the query on dimensions and the posting event with dimensions !
Ok we are completely good, We can finally consume it and use it !
On my side, as an examples, I will pick again Power Platform ! Power Apps + Power Automate as a business use case. But of course, as I said before, this API can be used also for integration in the other way. Yes you can POST on-hand changes ! For that I would recommend to try it in a Sandbox before :) but you can check it by yourself, I would not going deeper in this specific scenario
So let’s build now a quick Flow to consume it and make any kind of product available in a sample way and maybe post direct the result by a Teams Message to the end-user requesting the information (without going directly to the FinOps instance)
For that, I will use a Cloud Flow by a Trigger “Manual” but with some parameters, parameters I will use after to call the API. And share to the user by “Run Only” mode.
Business Case: “user in a mobile way via the Power Automate Mobile App wants to know in real-time the product availability amount in a specific site/warehouse” for 1 specific product and get the result in Teams via a Bot” - hell yeah ! :)

After I Init some parameters I will need for the next call (HTTP API) to the Inventory Service.

Same as the flow from Microsoft on the Index Trigger Configuration (you can inspire it) and do the Authentification part to the Service to get the Bearer Access Token.

And last but not least before calling the API, is to do the QUERY - in the MS Doc , you will see how you can put the Filters Schema (JSON) accepted.
As you will see I didn’t put any “group by” here, but you can do it by Dimensions if you want, it’s just a basic example for you.

Like below, you will see how to call the method “onhand/indexquery” - passing the Authentication part and the body (it’s my output of my Compose of my previous step : the query)
I can make 1 call to test the result, and parse the schema to a “Parse Json” step and after I can put the final step : Send the result by Teams to the end user
Reminder once more time, you have 450+ connectors in Power Automate so you can image way more use case than me :)


Simple as that ! You can also maybe call your Finance Operations instance by Power Automate if you want more data back to the notification message.
I didn’t put it as an example but you can now built quickly a Bot via Power Virtual Agent to call this same Power Automate Flow by passing those parameters and embedded this internal bot of the company on Teams.
For my last use case, I would pick myself a Power Apps (Canvas)
Imagine, you want shared a dedicated App quickly for your end users that can watch the inventory in real time for every products, based on same filter (like Warehouse / Site) or other dimensions (Color , Size etc…)
Yes you can ! Also forget something is that you have like below a dedicated Model Driven App to check the configuration part. The first one below is my dedicated customer Canvas App.

So here I use the standard D365 FinOps connector to get all Released Products (Data Entity : ReleaseProductsV2)
In which I can after make some filtering (top of the screen, like Site / Warehouse)
If I select 1 product, I can call the same Power Automate Flow I have done and put the results directly in Power Apps ! Again simple as that. Sorry for the design below, it’s not complete finished on my side, but It’s just a basic example for you to know how to leverage this and put direct result on the hand of the end users !

Hope you like this new article, the next one will be huge about a Deep dive with Synapse with FinOps & Dataverse side!
Don’t be shy and forward it to everyone that could be interested in! And you can put some comments below if you have some questions about it. I will try to update this article as soon as I can to add maybe more details on some parts.
And finally to close this chapter, a new English End-to-End video for you with some Live DEMO
Take care and see you next time !